


In the first installment of our Old School Builds project, we introduced this newly acquired Datsun 510 and our plans to build a street/strip track car. After spending nearly one year at the body shop, the sedan was back and we eagerly jumped at the opportunity to begin the long-anticipated build.
We set our sights on constructing a reliable driver that delivers excellent both on- and off-track performance, but not at the expense of practicality. The plan is to build a high-performance car with absolutely no compromise to its appearance – no body kit, funky paint job or shoddy fabrication work will be part of this project. We don’t mind giving up some creature comforts if it means our Datsun is built properly and able to outmaneuver some of the newer sports cars of today – a done-up interior and booming audio system aren’t really concerns for this project. The key for the 510 project is to improve handling for street driving as well as weekend track racing.
Finding the right car involves commitment and knowledge of the vehicle, as well as knowing what you’re getting yourself into during the build. Small purchases are one thing, but spending thousands of dollars on a car that’s over 40 years old is a risky proposition. It’s been almost four years since the 510 was purchased, and all of the parts needed to restore the car still haven’t been located – this isn’t a ride that you can simply order new parts for and call it a day.
Suspension Upgrades
Back in the late ’60s and early ’70s, this economical platform gained stardom and was quickly embraced by both amateur and professional race car drivers alike thanks to its exceptional handing and performance- two words typically unheard of during that time era, especially in reference to a Japanese vehicle. Datsun began production of the 510 in 1967, and it was finally released the following year in the United States. In a time era when most vehicle were still designed using leaf-springs, the 510 was an engineering marvel that featured impressive handling characteristics thanks to its MacPherson strut front suspension and independent rear end.
With 40-plus years of wear and tear on the chassis, including all things related to rubber, it was a no-brainer that our first task was to either upgrade or replace the entire suspension. We first began the arduous task of gathering aftermarket parts in order to obtain proper suspension geometry as they were the key to maximizing our car’s safety as well as improve handling on the street and at the track. To address the issue, we put together a recipe that consisted of a custom Ground Control coilover setup as well as a number of Futo Fab performance components, including a set of front lower control arms (LCAs), adjustable Tension Control rods, spherical control arm bushings, and rear camber/toe adjusters.
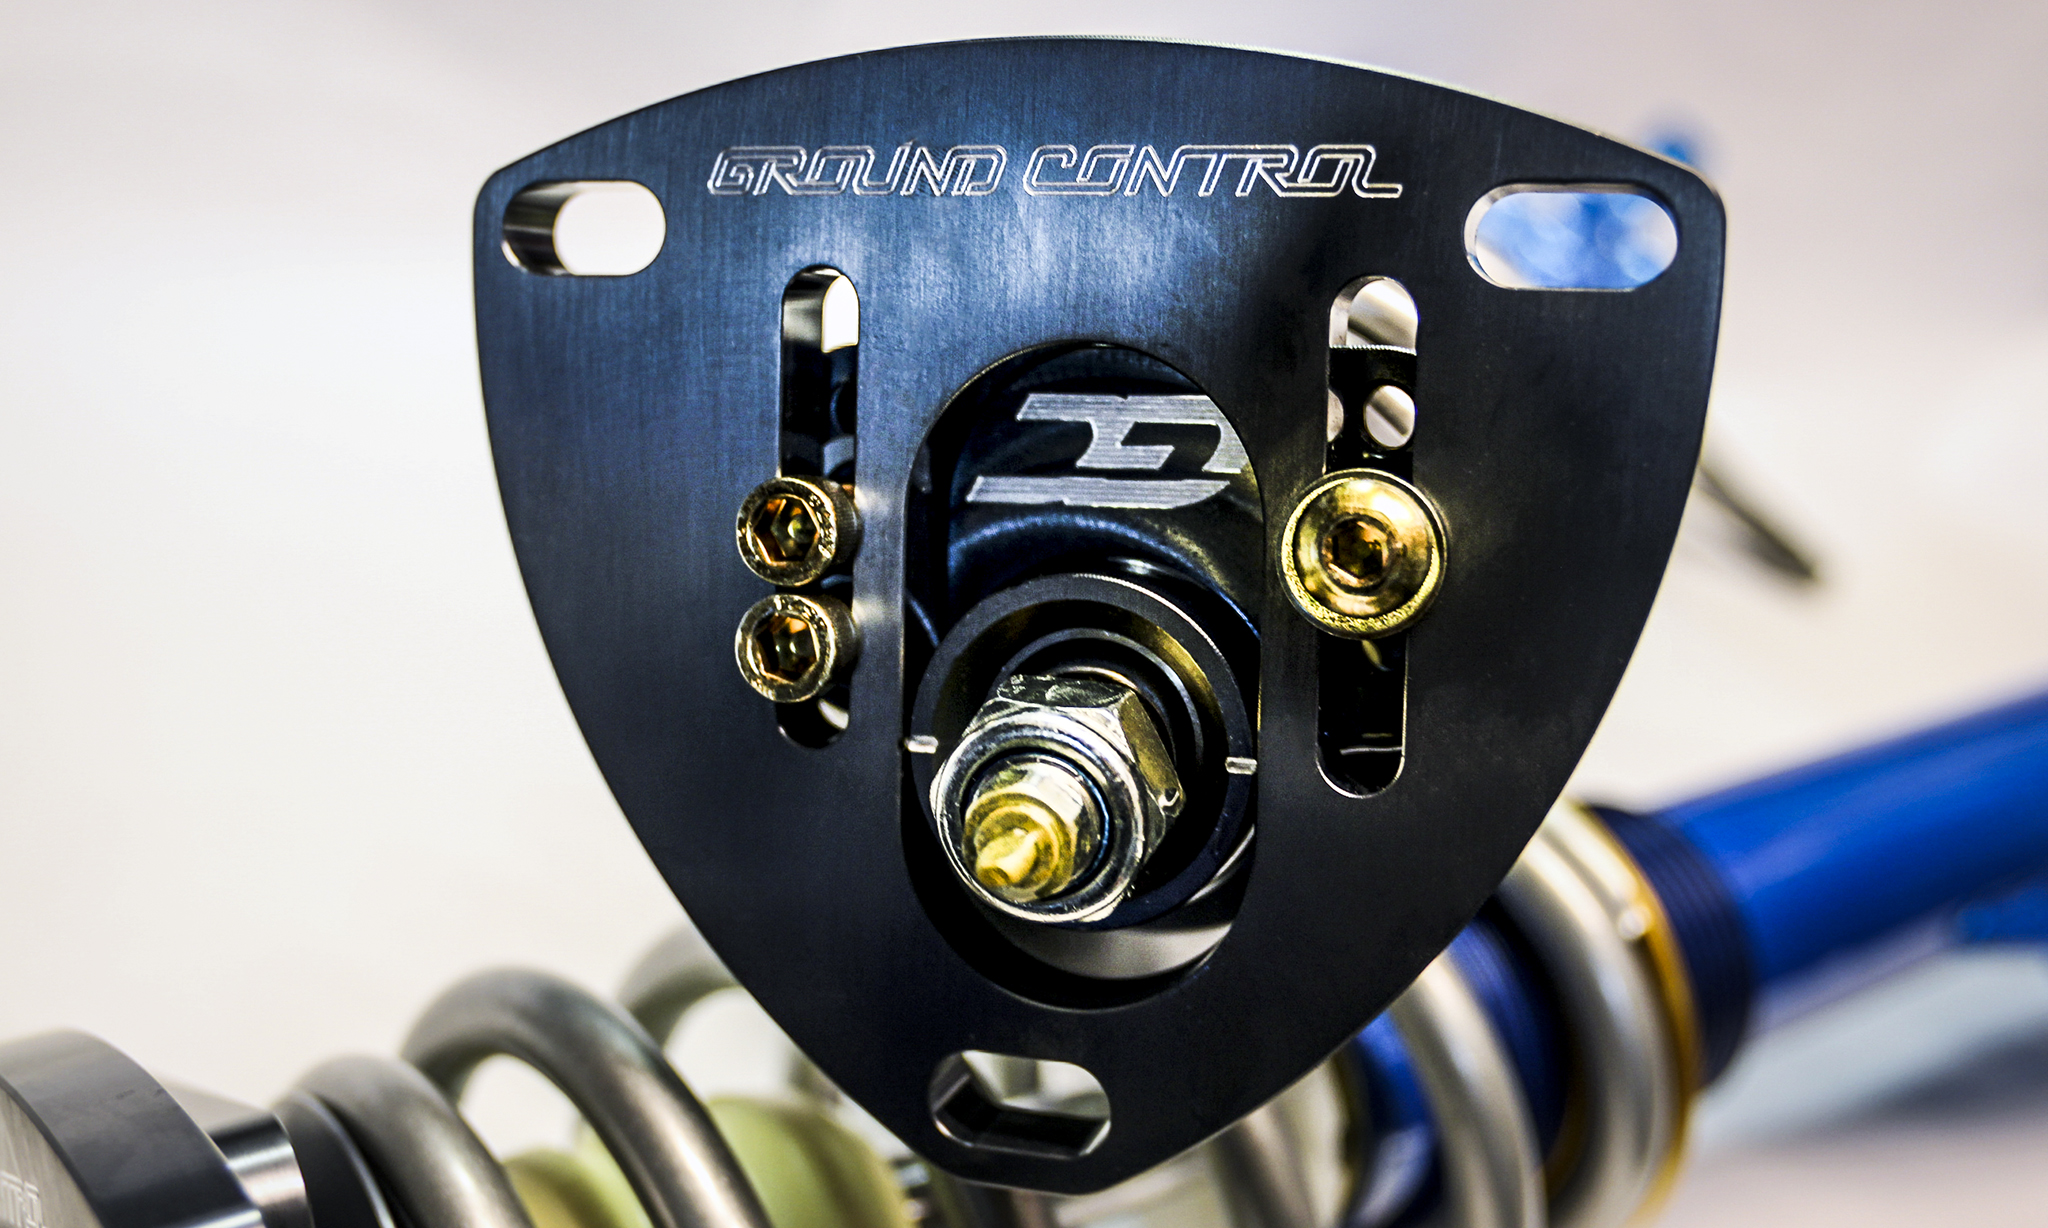
Ground Control Coilovers
Prior to contacting GC, we tossed our original front strut assembly, which had been equipped with no-name coilovers and single-piston OE brake calipers in the trash for a direct swap 280Z front strut assembly. In comparison to the 510 OE assembly, the Z has stronger spindles, larger brake calipers and aftermarket support with vented rotors. The rear drums were also discarded in favor of 280Z disc brakes.
The GC coilover system comes equipped with a camber/caster plate design that allows the sliding mount to go under the stock sheet metal. Ground Control uses the existing strut assembly and transforms it into a high performance coilover system, in the process customizing the vehicle’s suspension setup and spring rates according to the owner’s driving style and application.
The GC coilover setup uses Eibach race springs, aluminum adjuster sleeves, and gusseted strut supports. We went one step further and had GC powder coat the setup in blue to match the car, and powder coat the springs in silver to provide a nice appearance contrast. Although 375 pound/inch coilover spring rates sound high, we took into consideration how heavy our engine and transmission combination would be in comparison to the factory L16 powerplant.
The Datsun 510’s OE rear suspension is designed as a separate spring and shock combination. Interestingly enough, Ground Control’s rear coilover setup was designed to be mounted in an inverted position. GC designed their rear kit in this way to carry the weight of the car after springs are added to the shock. A Koni monotube adjustable rear shock is used for rebound damping; it’s mounted inverted so the vehicle has less unsprung weight, and subsequently improves suspension performance.
Futo Fab Suspension Lower Control Arms and Camber Kit
Limitless suspension adjustability is a big reason why we decided to upgrade to a set of double-adjustable lower control arms. The Futo Fab adjustable LCAs are made of 6160-T3 billet aluminum and are designed to replace the vehicle’s factory stamped steel control arms. Specially designed rod ends allow the user to turn the bolts to properly adjust the suspension and prevent premature and uneven tire wear.
We removed the OE rear cross member and noticed the arm brackets were slotted by the previous owner to address camber issues. This modification is common among 510 owners but we consider it merely a crutch if handling performance improvement is to be achieved. To that end, we decided to weld up a set of Futo Fab rear camber/toe adjusters, which provide 1.5 degrees of positive and 3 degrees of negative camber adjustment to go along with over one inch of positive/negative toe adjustment. At this time we also enlarged the exhaust hole to 3-inches to accommodate bigger exhaust piping.
Futo Fab recommends using the OE rubber bushings or spherical bushings with their kit, as polyurethane with any camber/toe adjustments will cause the bushings to bind. We carefully cut out the OE collars holding the bushings and chiseled them out. The spherical bearings deliver increased NVH inside the vehicle, but offer significant handling improvements. We adjusted both arms to the cross member before Evasive Motorsports technician JJ TIG-welded the collars into place.
Techno Toy Tuning Steering Rods
The decision to simply replace the steering rods for a set of OE units, or upgrade to Techno Toy Tuning’s adjustable outer tie rod kit was a no-brainer. These steel shafts are designed with self-lubricating Teflon-lined, fully-adjustable rod ends, which reduce bearing deflection and retain stability. When it comes to handling, these cars need all the help they can get!
Installing the steering kit required drilling the knuckles and control arm holes to 5/8-inch. A set of Techno Toy Tuning roll center adjusters were installed in anticipation of eliminating bump steer, a common occurrence associated with the 510 and lowered cars in general. We also picked up the company’s transmission mount kit to accommodate our SR transmission.
Custom Suspension Fabrication
In order to properly clear our soon-to-be-installed SR20VE hybrid engine, we modified the factory cross member by cutting and flipping the unit to clear the oil pan. At the same time, we reversed the steering rod for transmission clearance and had Design Craft Fabrication weld the parts back together. A custom front sway bar designed specifically for the SR20 engine was also purchased and bolted into place.
280ZX Brake Upgrades
A trip to the junkyard landed a hard-to-find 15/16-inch master brake cylinder pulled from a 280ZX. This master cylinder is a key component when upgrading both front and rear disc brakes for any 510 and is a direct bolt-on when using 280ZX struts and an aftermarket rear brake caliper adapter plate. We also coaxed the owner to throw in a set of rear brake calipers and proportioning valve which served as a critical component when upgrading to disc brakes on all four corners.
Ever attend a muscle car show and notice those flawless engine bays? Think about that for a second. Anything that wasn’t deemed necessary was either removed or hidden including brake hard lines and exposed engine wire harnesses that would otherwise clutter the appearance.
The clean appearance was exactly what we were attempting to replicate – we bent up some stainless steel brake lines as we painstakingly moved the entire brake system behind the firewall. The Datsun 280ZX proportioning valve we pulled from the junkyard was carefully mounted for the purpose of reinstalling the factory heater. Yes, even Californians need to keep warm from time to time! Also installed was a Nissan S14 gas pedal that was reworked and temporarily mocked up for the time being.
To increase braking performance, we purchased Stoptech slotted/drilled rotors, Project Mu B Force brake pads, and a set of Goodridge stainless steel brake lines. The drilled design of the rotors helps dissipate heat while the slotted grooves clean the pad, and are said to offer better bite and less brake fade in the process. The Project Mu B Force brake pads are designed to provide solid stopping power while emitting low dust and squeal properties.
Initially, we planned to use an E-brake we scavenged from the 280ZX but found an alternative solution – the entire assembly from a Honda Civic works as a retrofit of sorts. The Honda piece was installed into the tunnel and tied into the rear brake calipers using a Lokar universal brake kit. This is just a small sample of what’s in store from the H-badge family used in our 510, so stay tuned!
Kaaz 1.5-Way Limited Slip Differential
Finding a CLSD (clutch limited slip differential) in a 10 mm gear bolt design for our R200 long nose was nearly impossible. To remedy the situation, we decided to purchase a brand new unit from Kaaz USA that was designed for a Nissan S13 R200 short nose. The Super Q LSD 1.5-way unit comes with special clutch packs already prepared with WPC treatment for smooth engagement, improved heat dissipation, and longer gear life.
Since our new diff uses a 12mm gear bolt, a quick web search netted some special hard metal Teflon lined collars from McFadden-Dale Industrial Hardware. These collars were the perfect solution to insert into the new diff while using the 10mm ring gear and bolts. Kaaz USA owner Ray Nakadate suggested we adjust the clutch packs to 80 percent locking. This was deemed necessary as with our lightweight car, 100 percent locking would be too aggressive for street driving and would do us more harm than good.
Shingo Yugamii of Bluemoon Performance in Costa Mesa, CA reassembled the unit and checked all of the tolerances, finalizing the setup to ensure proper ring and pinion backlash. We finished off the installation of our rear end using a Mad Dat Motorsports differential bracket kit; this comes with urethane bushings, which were the perfect solution as our originally modified bracket bushings were heavily damaged.
Your eyes don’t deceive you – that’s a catch can installed inside the trunk. The primary reason we mounted this unit here was to collect any fluids from the differential. Spirited road racing or auto cross driving can cause the rear end fluid to heat up and expand, which can then escape through the factory breather vent located on the rear axle and spill out onto the track. With this can’s location, the fluid is able to simply flow up into the tank, then back down when it cools off, without the worry of oil escaping the system.
Wolf Creek Racing CV Halfshaft Axle Kit
Wolf Creek Racing has specially designed a complete CV axle bolt-on kit to replace the OEM U-joint half shafts. Designed for use with R160, R180, and R200 differentials used in 510, 610, 240Z, 260Z, and 280Z applications, these are a must to avoid severe drive-line vibration in a lowered vehicle. Each kit is comprised of Porsche-type high-performance CV joints, chromoly cages, hardened alloy races, and 4340 chromoly custom axles. When the 510 is lowered, it causes the OE half shaft U-joints to operate at a significant angle. This creates a fast/slow rotational pulse during the rotation of each joint. If the inner and outer U-joints do not have exactly equal and offsetting angles to phase out these rotational pulses, it creates a drive-line vibration. The larger the angle at the U-joint, the higher the rotational pulse becomes. In a severely lowered car, even the slightest difference in the offsetting u-joint angles will cause a driveline vibration. The only real way avoid to avoid this type of vibration is to convert to CV axles as we’ve done here.
Wheel Restoration
Literally no wheel was left unturned (no pun intended) for this project including when it came time to purchase a set of wheels. We found a set of SSR Formula Mesh wheels from a local seller, which we consider the perfect wheel for our project. The wheels were in bad condition as they originated in the ’80s; they’ve resisted the test of time, but still needed to be tuned up for use. We disassembled the 3-piece wheel and sent out the lip for polishing while the centers were stripped of their original paint and powder coated in gunmetal gray, then the hardware was replaced prior to reassembly. The center caps were the most difficult components to source as plastic becomes brittle over time. A total of two sets were purchased in order to create one quality set but not before they were refurbished and recoated before reapplying the SSR decals. We are so pleased with the outcome of our refinished pieces – and the fitment was dead on.
Stay tuned for part three of our Old School Labs series, where we’ll we focus on fuel system upgrades, custom interior work and replacing exterior rubber seals throughout the entire vehicle.
Gallery